SciGen Teacher Dashboard
Unit L7
Seeing Inside Cells


 Project: Clone the Clippy Cell
Duration: At least 150 minutes plus optional extensions
This activity uses common office supplies, like different kinds of paper clips, binder clips, etc. to construct a two-dimensional model of a cell, which is then manipulated, added to, and moved in order to demonstrate mitosis. It is a primarily an in-class, teacher-led activity with student exploration to associate cell structures, functions, and environments to a model of a cell built with common office supplies. Once the model becomes familiar, students take on the challenge of demonstrating step-by-step how one cell may become two by making a time-series illustration.
NOTE: This activity was adapted from an inspiring modeling activity developed by Art Sussman of WestEd.
LEARNING OBJECTIVES
Students model parts of the cell (membrane, nucleus, organelles).
Students model a cell’s four essential functions (getting energy, obtaining building materials, disposing of wastes, storing/following inheritable instructions).
Students model cell reproduction (mitosis).
Students capture the process in illustrative step-by-step images.
Teacher Tips
- Paper clips work best for linking to make the membranes, because they are easy-to-find and flexible. All the other recommended materials were chosen to balance costs and prep time for teachers. Other possibilities to consider:
- Add colored stickers or tape to black binder clips if you don't have colored ones on hand.
- If you don't have enough binder clips, some other office supplies you might consider to replace the binder clips include: pipe cleaners (also known as chenille stems); twist ties; small colored plastic paper clips; mini clothespins; etc.
- Add small rubber bands (also known as "silly bands") to the membrane model to represent pores in the membrane.
- While you can have your students set up their five containers in the first step of this activity, doing so may breed mayhem. Try to reserve time outside of classroom to do it in an assembly line. Veteran teachers strongly suggest that the teacher prepare the containers of clips, etc. rather than have the students do it.
- Some students will like the colors and will find a way to place them in their pockets. A veteran teacher offers this insight: "Once kids, especially middle school kids see bright, shiny objects, that’s all they can think about!" Make sure you have a system for all the materials to be collected as a complete set at the end of class. (Lots will end up on the floor, too! Make sure your reset includes a scan under desks and chairs.)
- While stop-motion videos representing the construction and functions of the cell are included in this lesson plan, you can also demonstrate the steps live. Simply set aside a set of materials for yourself and use a live-feed camera to project the steps for the class.
- This unique lesson is not for the faint of heart. A teacher who takes on this unusual project needs to be very organized and have a good grasp of classroom management to succeed with it. It is not recommended to be handed off to a substitute teacher, for example.
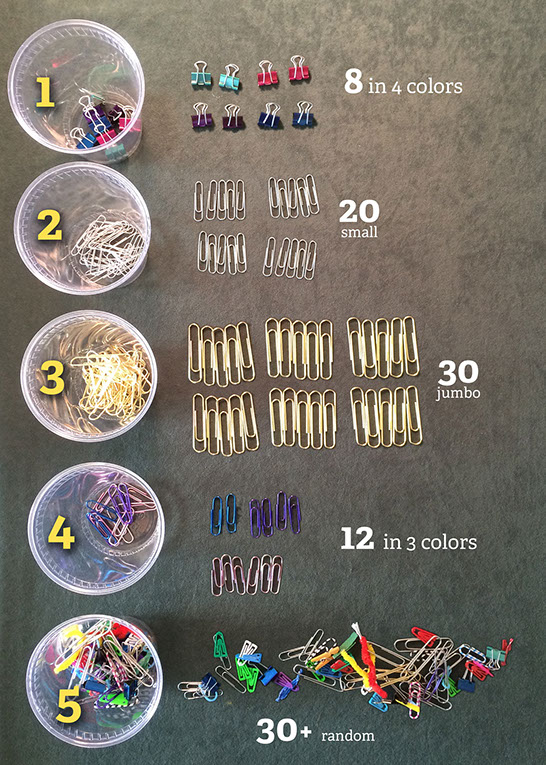
Materials (per group of 4 students):
- 5 containers (such as cups or envelopes) to hold the office supplies, each container labeled from 1 to 5
- 30 or more jumbo metal paper clips (all one color, such as standard silver)
- 20 or more regular-sized metal paper clips (all one color, such as standard silver)
- 8 or more colored small binder clips. There need to be at least 2 paper clips in each of four different colors. For example: 2 or more blue, 2 or more green, 2 or more purple, 2 or more pink. All the binder clips need to be exactly the same size and style, differing only in color.
- 12 or more colored small paper clips. There need to be at least 2, 4, and 6 paper clips of three different colors. For example: 6 or more pink, 4 or more purple, 2 or more blue.
- 30 or more items that are miscellaneous small office supply or arts & crafts products that can be connected to a paper clip: plastic paper clips, mini clothespins, regal clips, butterfly clips, rubber bands, silly bands, key rings, twist ties (cut into halves or thirds), other wire pieces, small segments of pipe cleaners (also known as chenille stems), 5mm-long pieces of drinking straws, mini clothespins, hairpins, etc.
-
Recommended: some image-capturing device (can be a tablet, camera, or a student's phone)
- Alternative: if you don't have a way for each group to capture images, distribute blank storyboard templates and ask students to draw quick sketches and write simple captions showing of how a cell divides, step by step.
Safety Check
- Reinforce that paper clips are not toys. They are an important part of this activity and need to be taken care of and not used as weapons.
Teacher Tune-ups
Teaching Notes
ACTIVITY OVERVIEW
- Meet the cell (10 minutes)
- Set up and assess office supply sets (5 minutes)
- Meet the model materials (5 minutes)
- Construct a cell model (20 minutes)
- Model cell functions (20 minutes)
- Explore cell reproduction (30 minutes)
- Capture cell reproduction images (30 minutes)
- Reset office supply sets (5 minutes)
- Present cell reproduction slideshows (20 minutes)
- Optional: assess for understanding
- Optional next steps: connections, other projects
Meet the cell (10 minutes)
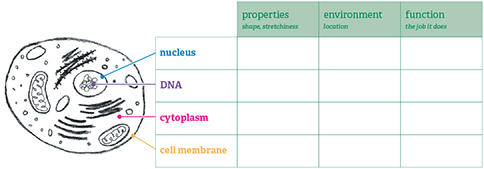
Initiate a class discussion prior to beginning the activity. Display these images of cells. Review and discuss cell structures already familiar to students.
Call attention specifically to
- cell membrane
- cytoplasm
- nucleus
- DNA
For each item (a–d), ask students to turn to each other to discuss
- its properties (shape, stretchiness)
- its environment (location)
- its function (the job it does)
Have students offer ideas and record some responses on this chart projected or drawn on chart paper or a white board.
![]() What Cell Parts Are and Do
What Cell Parts Are and Do
Set up and assess office supply sets (15 minutes)
Setting up containers
![]()
Meet the model materials (5 minutes)
![]() What does a chemical reaction look like in this model?
What does a chemical reaction look like in this model?
Construct a cell model (20 minutes)
Ask:
What do you notice about the binder clips?
Students should notice there are four different colors.
![]() Model the "instruction center" for your cell
Model the "instruction center" for your cell
![]() What order are your colors in?
What order are your colors in?
How is the DNA protected from the other parts inside in the cell?
Intended answer:
The nucleus is separated by a nuclear membrane.
![]()
![]() How is the DNA protected from the other parts inside in the cell?
How is the DNA protected from the other parts inside in the cell?
Put the DNA in a nucleus
How is the inside of the cell protected from the other parts outside the cell?
Intended answer:
The cytoplasm and organelles are protected by a cellular membrane.
Ask:
Are all the models exactly the same shape?
Intended answer: No.
Are all real cell membranes the same shape?
Intended answer: No.
Is it possible to change your membrane shape?
Intended answer: Yes. Do it!
Can you do another shape?
Intended answer: Yes. Do it!
Can a real cell do this?
Intended answer: Yes. Discuss.
![]()
![]() How is the inside of the cell protected from the other parts outside the cell?
How is the inside of the cell protected from the other parts outside the cell?
Add a cell membrane
Use about half of the jumbo paper clips to make a model of a membrane, like this.
![]() Are all the models exactly the same shape?
Are all the models exactly the same shape?
There are many more structures within a cell, but your newly made groups of one, two, and three colored paper clips will represent the rest of the “stuff” inside the cell, which we call organelles.
Feel free to address this in a more rigorous way if appropriate for your class.
![]()
Model organelles between the two membranes
Ask:
What are some examples of where various cells are located?
Intended answer: Cells are found within organs, floating in a pond, in a worm, etc.
Are cells ever completely alone with nothing around?
Intended answer: No.
Ask students to surround the outside of the cell with the miscellaneous items in Container 5.
![]()
![]() Where can you find cells? Are cells ever completely alone with nothing around?
Where can you find cells? Are cells ever completely alone with nothing around?
Add materials outside the cell
Model cell functions (30 minutes)
![]() How does this cell work?
How does this cell work?
![]() What would happen if the membrane broke? Or wasn’t there?
What would happen if the membrane broke? Or wasn’t there?
![]()
![]() What would the cell do if it needed to take in more materials?
What would the cell do if it needed to take in more materials?
![]()
![]() How does the cell move food and materials into the cell?
How does the cell move food and materials into the cell?
![]() How does the cell make a new part?
How does the cell make a new part?![]()
![]() How do cells move waste out of themselves?
How do cells move waste out of themselves?![]()
Explore cell reproduction (30 minutes or more)
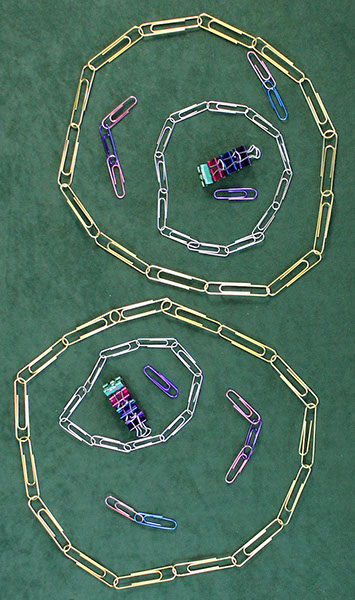
Cells make copies of themselves. How would you make another copy of this cell model? You might just organize all the pieces outside the cell into all the structures you need in order to make a second cell. Unlike you, cells don't have hands and arms they can use to change the world outside of themselves. Instead, they consume the materials they need and grow in size until they are so big they must split into two to become more efficient again.
Is it possible for your cell model to make an exact duplicate of itself by letting in, changing, and letting out materials to the cell’s environment? You can't take everything you need into your cell all at once. Figure out how to make it happen!
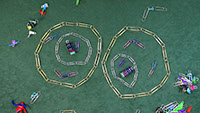
![]() Capture cell reproduction
Capture cell reproduction
![]()
 Is it possible for your cell model to make an exact duplicate of itself by letting in, changing, and letting out materials in the cell’s environment?
![]() Does anything outside the cell look like the things inside the cell?
Does anything outside the cell look like the things inside the cell?
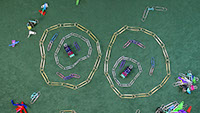
![]() What should happen in the cell if it gets too crowded in the cell?
What should happen in the cell if it gets too crowded in the cell?
Capture cell reproduction images (30 minutes or more)
Have students reset the cell as they did in the step "Construct a cell model." Now, ask students to create a slide show that shows one way that a cell can grow and reproduce.
Each step should show the cell doing only one of four things, and students can use the captions within their presentation.
- The membrane brings in new materials.
- The cell breaks materials apart.
- The cell builds copies of cell parts or changes the membrane.
- The cell disposes of waste.
- A membrane changes.
The PDF below includes these captions as a printable.
![]()
![]() Make Slide Shows
Make Slide Shows
Students share their slide shows.
An example set of images:


Reset office supply sets (10 minutes)
Resetting supplies
![]()

Present cell reproduction slideshows (30 minutes)
![]() Be prepared to share with others:
Be prepared to share with others:
- key features of your procedure
- interesting things you noticed about the cell and how it reproduces
- things about the model that are probably not accurate or that are missing
- questions that you might have
As you compare your cell slide show to others:
![]() How do these models represent the real life of a cell? How do they miss the mark?
How do these models represent the real life of a cell? How do they miss the mark?
![]() Do all the models of reproduction work exactly the same way?
Do all the models of reproduction work exactly the same way?
Optional: Assess for understanding
![]()
Optional next steps: Connections and other projects
If your students have read Dr. Otto and the Four Fatal Flaws — a story about self-replicating robots — point out that this exercise required
- export of waste from each of the synthesis reactions the students carried out inside the cell.
- energy (in this case from their fingers), just like the robots.
- information (in this case from student brains).
BETA Version - Please send comments and corrections to info@serpinstitute.org
![]()
![]() This project was supported by Science Sandbox, a Simons Foundation initiative dedicated to engaging everyone with the process of science.
This project was supported by Science Sandbox, a Simons Foundation initiative dedicated to engaging everyone with the process of science.
Strategic Education Research Partnership
1100 Connecticut Ave NW Suite 1310 • Washington, DC 20036 • (202) 223-8555
info@serpinstitute.org