SciGen Teacher Dashboard
Unit L5
The Sensational Single Cell
Lab: The Bread Necessities of Life
 Duration: Approximately 100 minutes plus additional growth time (90 minutes to overnight)
What are the "bare (bread) necessities of life"? In a front-of-class demo, compare yeast, sugar, and water vs. vinegar and baking soda. Estimate the amount of carbon dioxide produced by each after 24 hours. Students assess the effect of variables on a living system.
LEARNING OBJECTIVE
Students practice focusing on writing results (objective description, measurement) as opposed to interpreting results.
Teacher Tips
- The demo requires brief preparation of "mystery" bottles "A" and "B." A packet of yeast goes into "A." Two spoons (about 30 mL) of baking soda go into the "B."
- The demo can be started on Monday to allow for several days of comparing the yeast setup with the baking soda setup. Then, by Wednesday, the students will have seen two days of comparative growth between the two setups before deciding on their own experimental setup.
- Plan ahead for leaving the students' experimental setups for a few hours or overnight, for students to record results after time has elapsed. Students could, for example, label their setups and then place them on shallow plastic or cardboard trays (perhaps the boxes that 6-packs come in) so that these can be placed in a low-traffic corner of your classroom to sit undisturbed.
- The different parts of this experiment can be done separately. Students could observe yeast cells under a microscope as an independent activity, or in combination with the balloon activity described below.
-
This lab could require a daunting number of bottles if you have a lot of students in several periods. Give your students ample warnings over a few weeks to bring in water bottles. The online forum
Freecycle
is one place to go to request large amounts of reusable materials. Your community may have a
reuse center
that has materials for use in art and science classrooms, and if your closest centers don't have bottles for your needs, these centers may know where to find them. Finally, consider reaching out to local organizations, colleges or businesses who may host large events, marathons, and conferences in your area and generate a lot of 1-liter bottles at a catered bar, party, or hydration station at a marathon.
- The large number of bottles is more manageable with smaller film canisters. With smaller containers, your need for liquids and active dry yeast would also be greatly reduced, but this approach does add a measurement component that is time-consuming.
- Alternatively, the activity can be revised to use fewer bottles overall, gathering data as a class rather than in pairs. In this model, you would create a table to make sure no more than one or two students/pairs of students choose a value for the changed variable in their setup. And then you would aggregate data by collecting results for the entire class or "research team." All students would then use this aggregated data in their analyses. This alternative approach provides an important model for the collaborative nature of science research, where multiple teams must collect data and then share it while investigating a question too large for one team to tackle alone.
- If time allows, have your students examine yeast under microscope. If you have too few microscopes for students to use in pairs, consider pointing your document camera through the eyepiece. If you have no microscope, rely on photos and videos in other lessons in this unit to show your students what is happening with yeast as a microscopic level. A Foldscope is a low-cost, easy-to-assemble microscope made mostly out of paper parts, designed at Stanford University for use around the world to look at the natural world and to help keep local communities healthy. Some designs of the Foldscope can also be used with a phone or tablet camera to take pictures or video.
 Demo Materials (per class, for demo)
- 1 packet of active dry yeast
- 30 mL (2 tablespoons) baking soda
- at least 10 mL sugar (or 5 sugar cubes) per day of the demo
- at least 500 mL warm water (105º F – 115º F, or 40.5º C – 46º C) per day of the demo
- 250 mL vinegar per day of the demo
- 2 empty plastic or glass bottles (with a capacity of at least 400cc) per day of the demo
- 2 balloons of different colors or marked with "A" and "B"
- thermometer (to test water temperature, can be shared between groups)
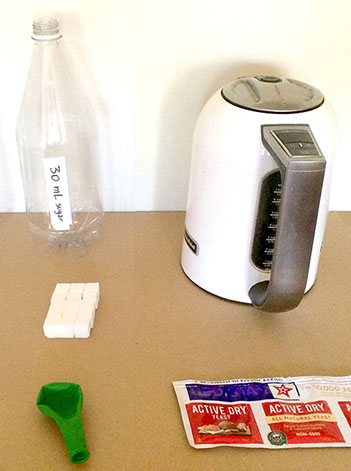
- optional: funnel (not necessary, but helpful)
Lab Materials (at least one per lab station)
- packet of active dry yeast
- 10 mL sugar (or 5 sugar cubes)
- 1L warm water (105º F – 115º F, or 40.5º C – 46º C)
- 1-liter plastic bottle
- balloon
- thermometer (to test water temperature, can be shared between groups)
- optional: funnel (not necessary, but helpful)
- optional: plastic cafeteria tray (to control spills)
- optional: microscope or Foldscope to observe yeast samples
Safety Checks
- Review with your students all your school's safety protocols when doing labs.
- Live yeast sometimes damage pipes. To clean up, pour your yeasty mix into a compost bin or somewhere outside. Or mix it with lots of water before draining. Killing the yeast with high temperatures may also work.
- Students inflating and deflating balloons will likely get into mischief. You can avoid this potential classroom management challenge by pre-stretching the balloons yourself.
Teacher Tune-ups
Teaching Notes
ACTIVITY OVERVIEW
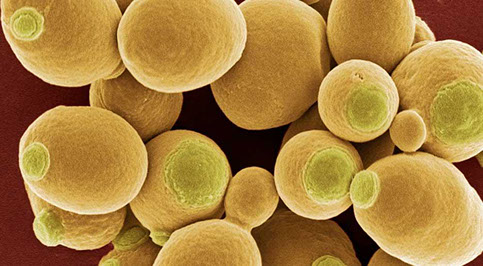
- Set the context by looking at yeast microscopically (10 minutes)
- Set up and discuss demo (10 minutes)
- Test yeast growth conditions (30 minutes to set up, leave overnight)
- Observe the difference between biological and chemical activity (10 minutes)
- Discuss demo results (10 minutes)
- Observe and record results of Yeast Growth Conditions test (30 minutes)
- Graph and discuss results (10 minutes)
Set the context by looking at yeast microscopically (10 minutes)
Set up a multi-day demo (10 minutes)
Preparation: Before class, label two bottles "A" and "B." Pour the packet of yeast into "A." Pour two spoons (about 30 mL) of baking soda into the "B." You can pour it straight from the packet, or use a funnel if you have one, or paper bent into an open-tipped cone.
For bottle "A," you will mix to dissolve the outer layer of dead yeast cells on the granules, and in bottle "B" you will mix to dissolve the baking soda.
Run a demonstration at the start of the class. In this front-of-class demo, you will show the differences between yeast and baking soda as leavening agents. The students will not know which substance is in which bottle.
Leavening agents are the things that add the air pockets to baked goods. Sometimes we use yeast (as in yeast breads, like a baguette or a sliced sandwich loaf) and sometimes we use acid and bases that react (as in many "quick breads," such as a pumpkin loaf or banana muffins, which use baking soda and something sour like buttermilk).
Summarize your steps as you run the demo for your class. As students observe the changes happening in the bottles, it’s likely someone will say that one of them is baking soda and vinegar. This is an inference, and they should be made to back it up by stating observations.
Paraphrase:
Note that both mixtures yield carbon dioxide as an output, and that the balloons fill with this carbon dioxide.
Show the next slide with the chemical formulas written as an equation. Students don’t need to understand the formulas, but exposure is good. See if they can figure out which chemical formula is vinegar (CH3COOH) and which is baking soda (NaHCO3). They will likely guess rather than know the answers.
Paraphrase:
Is It Alive? Demo, Part 1
What did you observe in the two different bottles?
Explain what you think accounts for differences observed in the two setups.
Observe the difference between biological and chemical activity (20 minutes)
Day 2 is the demo that has more powerful observations. The yeast will continue eating sugar and making gas, while the baking soda is finished. During this part of the lab, evidence starts to appear that the baking soda isn’t alive.
Compare the output of the two bottles. How full are the balloons on each?
Show the slide with the procedure for Day 2.
Ask:
What happened in these two setups?
How are they different?
How do they differ from what we observed in Part 1?
Use your observations and what you know about biological processes in cells and chemical reactions in non-living materials.
Students should arrive at some hypotheses/explanations like these. Gently encourage them towards these conclusions without giving them the answers. They should be able to hypothesize on their own and generate data that back these hypotheses up. For example:
Baking soda is not alive, so unlike yeast it does not reproduce. Once the baking soda combines with the vinegar, the supply of baking soda is exhausted. When more vinegar is added to the baking soda solution, the solution does not react. In contrast, the yeast solution uses sugar to reproduce. More yeast is hungry for more sugar on the next day. It will continue to grow and reproduce.
To extend the demo comparing the two bottles up to five days, repeat the same eight steps of Day 2.
Is It Alive? Demo, Part 2
What did you observe in the two different bottles for this refreshed setup?
How would you quantify what you see?
How would you differentiate the two setups?
Explain what you think accounts for differences observed in the two setups on the two days.
Does the yeast culture continue to multiply even though it becomes diluted by the daily transfer?
Test yeast growth conditions (30 minutes set-up, leave overnight)
In this part, students change the conditions for the yeast and identify variables to change. If your students are unfamiliar with dependent and independent variables, see more about them here.
Having demonstrated what happens with one bottle of yeast, water and two cubes of sugar, and how it compares to a similar setup with baking soda, challenge your students to come up with ways to change the conditions for the yeast. As a class, you will run an experiment to find yeast's optimal growth conditions.
As a class, talk about what factors you can vary in the experimental setup. Each student should choose just one variable to change. Variables in this setup include:
- amount of yeast
- amount of sugar
- amount of water
- temperature of water
- temperature of environment
Keep track of what variables the students choose to change, and encourage the students to change their variable differently. Or, to keep things simple, you can also assign variables to groups. So, for example, no more than three students should increase the amount of sugar added to the bottle to 40 mL of sugar. If a fourth student wants to increase the sugar, encourage them to choose a different larger value. This variation will give you a better spread of data as a class. Not all the variables need to be tested. In fact, you could have the students only test the results with different water temperatures, or different amounts of sugar. If you have enough bottles, each student or lab pair/group can set up two or three bottles with different values for the variable.
You will set up a control similar to the yeast bottle in the class demo.
Before you run the experiment, the students should write a hypothesis. Ask the students:
If time permits, students should write their own procedures. The more they write for themselves, the more thinking they do about how their actions will affect their results.
Keep the focus on objective description, with the mantra, "If you don’t know what you saw, then you don’t know what it means."
Students follow the procedure to set up their bottle, changing one aspect of the setup and keeping all others constant. They observe and record their immediate impressions and observe the results of what happened with the yeast lab setup overnight.
For students who used different temperatures of water in their experiment, comparing their results to this Exploratorium bread baking chart may be helpful.

- Open your lab notebook to take notes.
- Stretch the balloon by inflating it several times, then set it aside.
- Decide which ONE of the variables you will change in your setup that differs from the control setup:
1 packet of yeasttwo cubes (about 10mL) sugar250 mL water (111º F or 44º C)setup placed in room temperature air out of direct sunlight - Before you run the experiment comparing the three bottles, write a hypothesis. What do you think will happen in the three different bottles? Why?
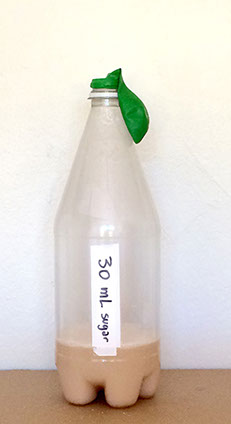
- Label your bottle to indicate your changed variable. (In the example, the researcher changed the amount of sugar from 10 mL to 30 mL, and kept all the other values the same.)
- Put the water into the bottle.
- Put the yeast into the bottle (using a funnel, if available) and swirl it into the water.
- Put the sugar into the balloon. Stretch the mouth of the balloon over the opening of the bottle to make a tight seal.
- Pull the balloon up so that the sugar falls into the yeast solution.
- Place the bottle in a warm place not in direct sunlight.
- Wait. It may take 20 minutes or more before the balloon changes enough to notice.
- Observe what happens in the bottle, and what happens to the balloon. Measure the circumference of the balloon at the end of the class session.
- Record all your observations and measurements in your lab book.
- Let your lab setup sit overnight.
- Observe what happened in the bottle over the past 24 hours, and what happened to the balloon. Measure the circumference of the balloon.
- Record all your observations and measurements in your lab book.
Discuss results (10 minutes)
The students measure and record their data after the yeast bottles have sat overnight. When finished with the activity, ask students:
- What did you observe in your setup?
- If there was another student with a similar change in their variable, how do their results compare to yours?
- Explain what you think is happening, using what you observe and what you know about baker’s yeast.
Graph the data as a class. Collect data from the different researchers who worked on the same variable.
Write up results. The main focus here is on objective, descriptive reporting, as opposed to interpretation. Both kinds of writing are important in science; it’s important to distinguish between them and practice both.
Distinguishing findings and speculations
Respond in writing to the questions, then compare and discuss your answers with someone else. What's the difference between findings and speculations? For example, which of these two statements is a finding? A speculation?
The yeast produced more gas to inflate the balloon
when the amount of sugar was increased.
vs.
The yeast must really like sugar!
BETA Version - Please send comments and corrections to info@serpinstitute.org