SciGen Teacher Dashboard
Unit E3
Delivering Power to the People
Pedal Power
More About Power—Biking Uphill
Energy Transformations
Electricity Generation
Power Priorities
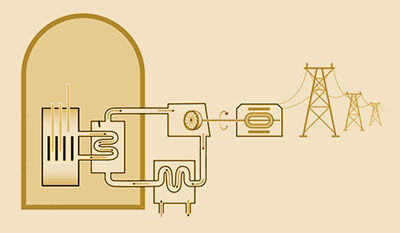 Lesson: Electricity Generation
Duration: Approximately 70 minutes
Learn how generators, solar cells, and batteries make electricity in this illustrated guide. Students watch an explanatory video, then learn about how generators work. Then they compare them to stationary bicycles. Finally, students expand their understanding of generators as they explore how various types of electrical power plants and other energy sources work. They look at how turbines, thermal power plants, and solar panels all generate electricity in different ways.
LEARNING OBJECTIVES
Students understand the connection between electricity and magnetism.
Students explain how rotational motion is turned into electrical power.
Students apply their understanding of potential and kinetic energy, conservation of energy, energy transfer, and energy flow to explain different energy generation methods.
Teacher Tips
- There are a lot of toys and geeky gadgets that use generators to power lights or speakers. Consider bringing in some hand-cranked flashlights or radios for the kids to handle.
- Illustrating the turbine section with an actual pinwheel that you buy or make (using paper, a pin, and an eraser, for example) will help your students grasp the concepts in that section better.
Materials
- electronic devices to use generator simulation
- optional: hand-cranked generators
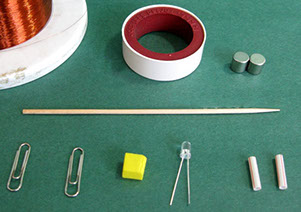
- optional (if building generators as an extension): neodymium magnets, insulated copper wire, LED, skewer, straw, two shallow cylinders, two paper clips
Teacher Tune-ups
Teaching Notes
ACTIVITY OVERVIEW
- Set the context: watch Energy NOW's "Electricity Generation" (10 minutes)
- What are the basics about generators? (10 minutes)
- Interact with a generator simulation (15 minutes)
- Optional extension: Build a generator (30 minutes)
- Take a closer look at turbines (15 minutes)
- Take a closer look at thermal power plants (15 minutes)
- How are solar panels different? (5 minutes)
Set the context: watch Energy NOW's "Electricity Generation" (10 minutes)
What are the basics about generators? (10 minutes)
This section introduces how generators work.
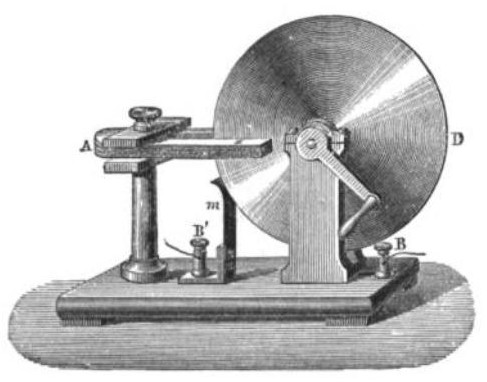
Show Slide 1 to introduce Michael Faraday. He built the first generator.
Show Slide 2. Paraphrase:
Take a look at Faraday's invention. It is called the Faraday Disk. It was one of the first examples of a machine using a magnetic field to generate electricity. Michael Faraday first constructed it by mounting a magnet on a stand. The magnets were shaped so the spinning disk could fit between the north and south poles of the magnet. While this contraption seems pretty simple, it can actually turn motion into electricity!
Ask students what they notice. Point out to students that this is an old drawing and the letters probably had labels. Ask students if they can guess what A, B, D, and M stood for. A is the magnet, B is a post to hold the electrical wire, and D is a spinning disk. M probably is a brush.
Show Slide 3 and discuss the picture of the magnet with iron filings.
Ask:
What are the wavy, black lines?
Intended answer:
Metal shavings that are lining up along the magnetic fields.


Interact with a generator simulation (15 minutes)
Students interact with a simulation of a generator that can be toggled between an alternating current and direct current generator.
To introduce the simulation, paraphrase:
Take a look at this simulation of a generator. This simulation shows a simplified view of a generator where the magnet is stationary (i.e. it doesn’t move) and a copper coil rotates through the magnetic field.
Note: Intended answers to suggested questions below are indicated with bullets. Do not read these out to the students: they are available if you need to help your students come up with an answer.
Ask:
Where’s the magnet?
- The magnet is the u-shaped, red and blue structure.
Ask:
What do you think represents the conductor loop copper coil? (small, rectangular loop of red)
Paraphrase:
In generators, conductor loops are often copper coils with hundreds of windings of insulated wire.
Ask:
What else do you see?
Students may be able to identify parts. If not, you can prompt them to identify them.
What are these blue lines?
- The magnet creates a magnetic field.
What is this gold handle doing?
- It turns a rotor (purple) that in turn spins the copper coil conductor loop (red line).
How about these red lines over here?
- Those show the circuit with a resistor (brown) that carries the current from the generator to the voltmeter (white).
What’s this white meter with the “V” on it?
- A voltmeter that registers the voltage.
What is happening in the black graph in the corner?
- It shows the changing voltage in the circuit.
Does the voltmeter have anything to do with the white dot traveling along the curve?
- The value on the voltmeter shows up as a white dot traveling along the curve.
(With Alternating current selected) Do you see a white dot anywhere else?
- Yes—on the spinning rotor. Its position on those spinning rings seems related to the value on the graph.
(With Direct current selected) How does the white dot in the graph relate to the spinning disks when this is simulating a DC generator?
- Whenever the black bar connects the two sides of the circuit, the circuit turns black and the voltage is at 0.
Have students adjust the values on the sliders and switches. After they are done, have them describe to one another how energy travels through the system. One possible description:
The handle is turned using kinetic energy from a person. That kinetic energy is transformed into rotational kinetic energy by the spinning disk. The copper and the magnet work together to transform the kinetic energy into electricity. The circuit picks up the electricity. The electricity moves through the meter and registers voltage.
Note that while you can toggle the rotational motion to pause or continue, this simply freezes the simulation. (The voltage would fall to zero as soon as motion stops.) Also, the simulation’s designer, Walter Fendt, explains "Instead of an armature with many windings and iron nucleus there is only a single rectangular conductor loop; the axis the loop rotates on is omitted."
Credit: Simulation adapted from Walter Fendt under a Creative Commons Attribution-NonCommercial-ShareAlike 4.0 International License.
Alternate simulation: if your electronic devices cooperate well with java, you may also introduce the generator using PhET’s generator simulation.
Optional extension: Build a generator (30 minutes)
Better than any simulation, have your students build a simple generator! Arvind Gupta Toys shares many easy, low-cost projects on his motors and generators page, such as the very simple spool generator. Note that you can use other cylinders, such as pieces of plastic bottles or toilet paper tubes, instead of the materials recommended in this video (which may be easier to get in India, where Gupta produces his videos.
Images used with permission from Arvind Gupta Toys: Toys from Trash.

Take a closer look at turbines (15 minutes)
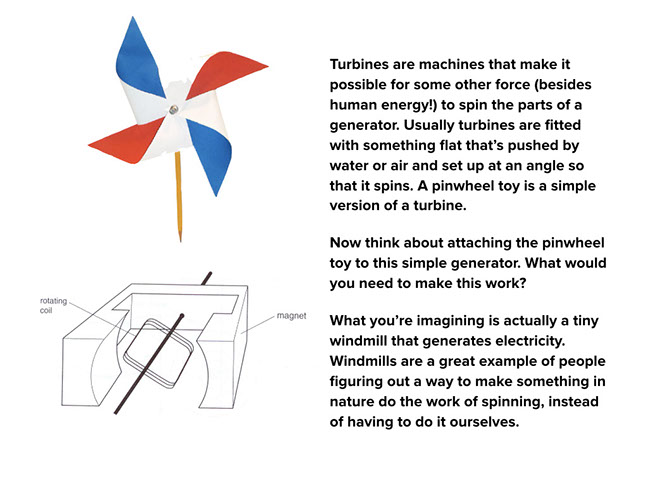
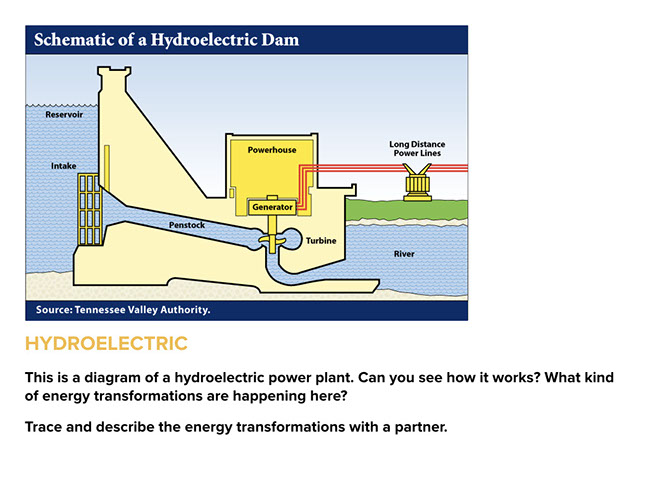
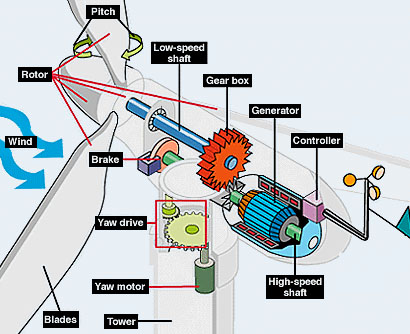
Have students discuss why a pinwheel is like a turbine. Then ask how a pinwheel could be attached to the simple generator that is shown at the bottom of the page. Ask if such a system could produce much electricity. Tell students that on the next page they will see an example of a very large windmill that generates a large amount of electricity.
Introduce how how natural, renewable resources (falling water and blowing wind) turn turbines and produce electricity.
You may choose to have small groups or partners read and complete this page without a whole class discussion. It may help to first reiterate that “trace” means to “follow.” Also challenge students to describe what type of energy is being transferred. Remind them that they know the terms kinetic energy and potential energy. Give students 5 to 10 minutes to read the prompts, discuss, and write their responses. Then ask students to share their responses with the class.
:
- Water sits in a dam with gravitational potential energy. Then the water rushes from the dam down to a river with a huge amount of kinetic energy. Inside the dam, the rushing water flows through a turbine and spins it. That motion gives the turbine rotational kinetic energy that turns a generator. From the rotational kinetic energy, generators produce electricity. The electricity flows through the power station and then onto high voltage power lines to another power station inside a city. From there, it flows through more power lines and into houses.
- For the wind turbine, a student may answer: The potential energy of air is all around us. When the wind blows, the air has kinetic energy. That energy turns the blades of the rotor of the windmill. The blades have rotational energy that turns the low-speed shaft of the gear box. This makes the gears turn. The gears work like the gears on a bike or car and transform slow rotational motion into fast rotational motion. The high-speed shaft of the generator spins much faster than the blades of the windmill. Next, the generator takes the rotational kinetic energy and makes electricity. The electricity is controlled by the computer and runs on wires down the support post of the wind turbine.

Take a closer look at thermal power plants (15 minutes)
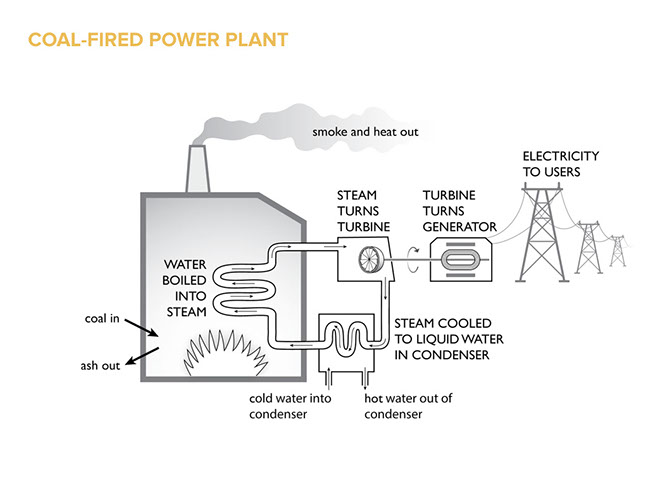
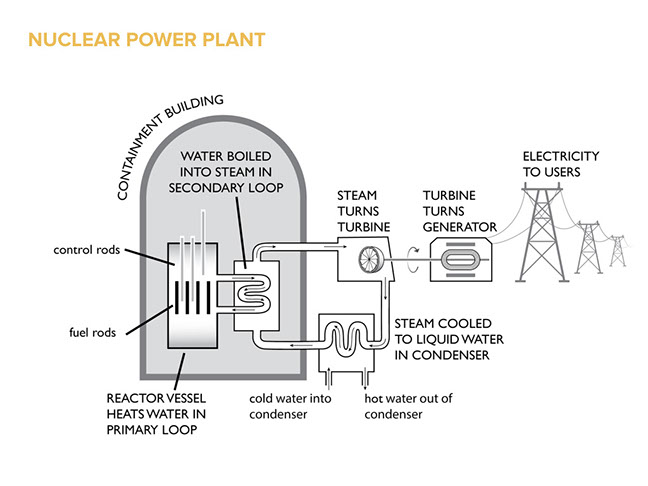
Students continue to examine the flow of energy in power plants. This power plant is a coal-fired thermal plant. As on page 11, it may be best to read the prompt as a whole class and then encourage pairs or groups to describe how energy is transferred within the system. Perhaps remind students about the picture of the person using charcoal to grill dinner. Charcoal is similar to coal; they are both plant-based fuels. Allow 3 to 5 minutes for students to discuss and write about energy transformations. Students could use arrows to signify the transformations.
:
- Coal is made from plants and trees pressed over millions of years. The chemical energy of coal is turned into thermal energy when it is burned. The thermal energy heats up water and turns it to steam. The steam has kinetic energy as it rushes over the blades of the turbine. The turbine has rotational kinetic energy as it turns. The turbine turns a generator. The rotational kinetic energy produces electricity. As with other power plants, electricity is carried to wherever it is needed by power lines.
- There are also thermal power plants that heat water using other methods than burning coal. A nuclear power plant uses uranium that has been made into nuclear fuel. Other common methods in the United States are burning natural gas, burning oil, burning trash, and sometimes even burning the gases given off at landfills.
How are solar panels different? (5 minutes)
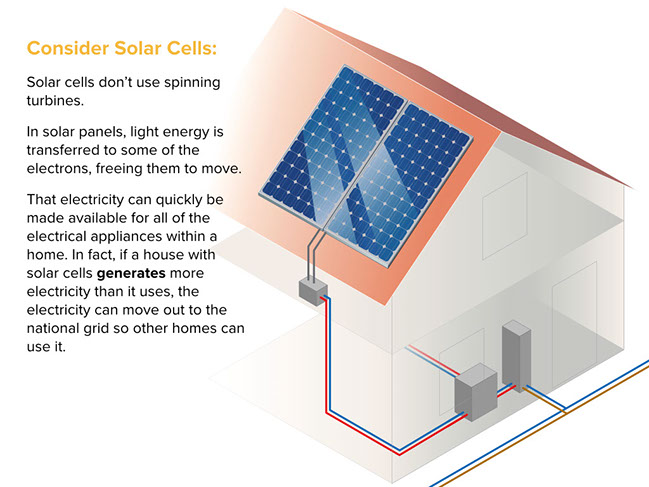
Most students are familiar with solar panels that capture sunlight and convert it into electricity. The text states that excess “electricity can move out to the national grid.” You may need to clarify that the “national grid” is all the connected power lines in the United States. Of course, excess electricity can also be stored in batteries. In fact, for any house that is “off the grid,” with no connection to power lines, batteries must be used to store electricity from solar panels.
For students interested in learning more about solar power, there are many sources online. This link below is from the US Department of Energy. It involves a bit of reading, but is thorough.
BETA Version - Please send comments and corrections to info@serpinstitute.org
