Waves of Energy
RETIRED BETA VERSION - For current versions of the SciGen materials, please visit serpmedia.org/scigen
SOUND STATIONS: Exploring the Nature of Waves
Set up stations where your students can interact and play with sound in several different ways. There are nine suggestions below, and each can take about 5 minutes. You can set up as many as you'd like, or just pick one activity for everyone to try as a class. Each activity has PDFs of printable pages for the station's suggestions/instructions and recommended discussion questions.
- Electronic Oscillo-piano-scope (online)
- Feel the Hum* (no materials required)
- Making a VERY Old-School Telephone* (cheap/free materials required)
- Pluck the Stick* (cheap/free materials required)
- Pepper on the Dance Floor (cheap/free materials required)
- Straw Pipes of Pan Flute (cheap/free materials required)
- Hydro-Xylophone (cheap/free materials required)
- Tuning Forks* (pricey materials required)
- Resonance Boxes* (pricey materials required)
The starred (*) activities were developed in cooperation with Kate Maher of M.S. 20 in the Bronx—thank you!
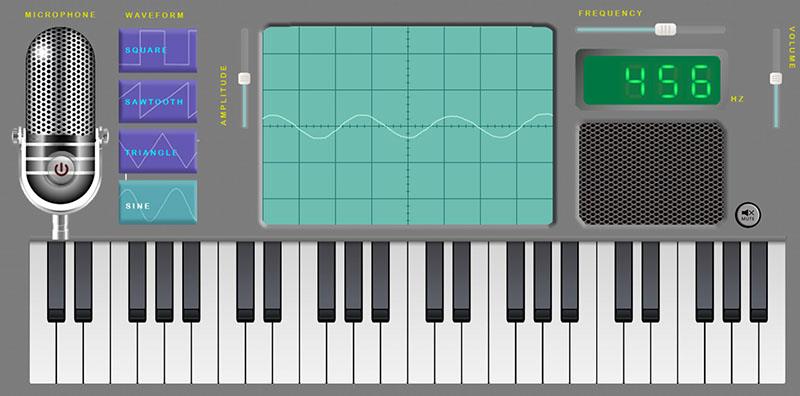
Sound Station: Electronic Oscillo-piano-scope
Scientists and engineers use a tool called an oscilloscope to compare different waves, including sound waves. The "oscillo-" part of the word means "swing", just as in the word "oscillate." Musicians don't usually pay any attention to the shape of the waves, but this special instrument makes sound and then lets you play around with it.
Materials:
- Microphone that can be plugged into the computer (optional)
- Electronic device (such as a computer, tablet, or mobile phone) with this online app loaded (Note: Here's a sketch of what the interface may look like when complete. We were inspired by this keyboard and two demos on Academo: virtual oscilloscope and amplitude modulation. Meanwhile, our online app is in development.)
Procedure:
- Use your cursor to "press" keys on the keyboard (the keys on your keyboard for A, S, D, F, J, K, L, and semicolon also work.) Note the frequency in hertz (Hz) and the shape of the wave in your notebook.
- Click on the "hold a note" button.
- Change the shape of the wave by clicking on one of the purple buttons: square, sawtooth, triangle, and sine. Listen for the difference in the tone and watch how the curves change for the same key when the keyboard is set to sine, square, and triangle.
- Change the shape of the wave by sliding the frequency slider back and forth. Observe how the wave in the window changes.
- Change the shape of the wave by sliding the volume slider up and down. Observe how the wave in the window changes.
- Change the shape of the wave by sliding the amplitude slider up and down. Observe how the wave in the window changes.
- Turn off the "hold a note" button. Turn on the microphone. Make sounds towards the microphone or built-in sound sensor on your electronic device. Hum or sing a high note (like “eeee!”), then hum or sing a low note (like “OOOO!”)
- Musicians often tune their instruments using the "A4" note, which is the "A" just above what musicians call "middle C". Its frequency is 440 Hz. Can you find the key corresponding to A4? Can you find the A whose frequency is 220 Hz?
![]() Turn and Talk
Turn and Talk
Answer these questions in your lab book.
Is there a difference between volume and amplitude?
How do the different shapes—square, sawtooth, triangle, and sine—sound different?
Why does the live input of the microphone make such jagged waveforms, while the notes produced by the computer are much more smooth?
Describe the different waves for different pitches for high and low notes.
How does pitch or frequency affect the waveform on an oscilloscope?
How do the curves compare for keys whose frequencies are 440 and 220 Hz?
How do the sounds compare when the same note is played as a sine, square, or triangle waveform?
Sound Station: Feel the Hum
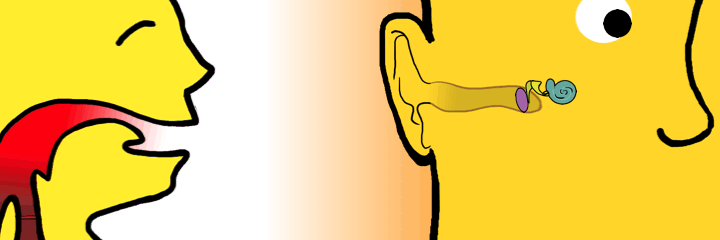
The human body is equipped to make and sense sound vibrations. While we think of our ears as organs of hearing, the fine hairs are actually very tiny touch sensors that sense movement in the fluid of the cochlea, the curled canal inside the inner ear. The vocal cords change shape to produce distinct tones that are further shaped and amplified by the throat and mouth. In this activity,
Materials:
- none
Procedure:
- Touch the front and sides of your throat with one to three fingers and hum or sing a note until you find the spot where you can most easily feel the vibration of your vocal cords.
-
Change the pitch of your hum and repeat step. Try the following:
-
-
a high note (like “eeee!”)
- at a normal volume
- loudly
- quietly
-
a low note (like “OOOO!”)
- at a normal volume
- loudly
- quietly
-
a high note (like “eeee!”)
-
![]() Turn and Talk
Turn and Talk
Answer these questions in your lab book.
What do you feel as you hum?
How did you create different pitches?
YOu can find your pulse in your neck in the vein not too far from your vocal cords. Why do we hear air vibrating the vocal cords but not the pulse amplified?
What's making the sound and how do we hear it? Watch this looping animation. Roll over parts of it to learn more about what's happening. How does the animation describe how the sound waves of the human voice are generated and received? Draw a diagram like this in your lab book.
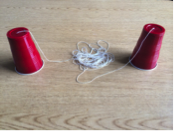
Sound Station: Making a VERY Old-School Telephone
Sound waves are mechanical waves; they need a medium to transmit energy. When we clap our hands, the air between our hands gets compressed. The air molecules bump into each other, creating a vibration that travels through the air as a longitudinal or compression wave.
Materials:
- 2 cups
- 6 meters of string
- scissors
- nail (or other device for poking a small hole)
Preparation:
- Measure and cut a 6-meter length of string.
- Using the nail, poke one small hole in the bottom of each cup.
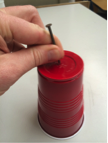
- Feed the string through the bottom of each cup and tie a large knot so that the string cannot pull out.
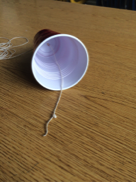
- After making a phone with a 6-meter length of string, you might try different lengths of string so students can see how the length affects the effectiveness of the phone.
Procedure:
- You and your partner each take a cup. Walk away from each other until the string is taut (tight from one cup to the other.)
- Take turns speaking softly into the cup while the other partner listens. Tip: put the cup over one ear and your hand over the other. You may hear the transmitted sound better and isolate it more clearly from sound in the room.
- Be sure to keep the string taut (tight) while you are using your old school phone. Have one partner speak into the cup, while the second partner listens. Touch the string at different points along it, and notice how this affects the sound. Move closer to each other to make the string loosen, and walk slightly farther apart to tighten the string. (But not so tight the knots fly out!) Record your observations for these different conditions in your lab notebook.
- Switch roles: the partner who spoke into the cup now listens to the other partner.
- Finally, both partners listen while one partner runs their finger along the string.
![]() Turn and Talk
Turn and Talk
Think about it. How does that work? Answer these questions in your lab book.
Describe the series of different materials that vibrated to make the telephone carry sound.
Which medium conducted sound more effectively- the air in the room or the cups and string? Why?
When you speak into the cup, what type of wave are you creating?
What is the medium that is transmitting the sound wave from your mouth to the bottom of the cup?
What do you think happens when the sound waves reach the bottom of the cup?
How does the sound of your voice travel from your cup to your partner’s cup?
What happens when the sound waves reach your partner’s cup?
Sound Station: Pluck the Stick
Every sound is made when something vibrates. Sometimes it's the skin stretched across a drum, sometimes it's a plucked string. By fine tuning the amount of what is vibrated, you can make notes of different pitches. Students adjust the pitch of a simple musical instrument by changing the amount of freely moving wood that gets plucked.
Materials:
- metric ruler
Procedure:
- Press a stick against your desk so that 20 cm hangs off the edge. Press down on the stick and quickly release. Listen to the sound it creates.
- Repeat Step 1 at 18 cm, 16 cm, 14 cm, and 12 cm.
![]() Turn and Talk
Turn and Talk
Think about it. How does that work? Answer these questions in your lab book.
What happens to sound as you change the length of the ruler that's hanging off the table? What would you predict would happen if 25 or more centimeters were hanging off the edge of the table?
At which length did the stick create the sound with the highest pitch? Why do you think this is?
Compare what you have observed at this station to a musical instrument. Explain your comparison.
Sound Station: Pepper on the Dance Floor
Students may be familiar with the pumping beat heard from a passing car, with the bass set so high and the volume so loud that the neighborhood windows shake. This transfer of energy is easy to see with a small boom box and some pepper sprinkled on paper. For a more ambitious demo, consider building a Chladni Plate or at least watching a video of them in action.
Materials:
- media player with a decently loud speaker (such as a boom box)
- balloon
- paper plate
- pepper
Procedure:
- Blow up a balloon and hold it up in front of a speaker between your two hands. Play some music and turn the volume knob.
- Tilt the speaker so that it is pointing up. Lay the paper plate over the speaker, and sprinkle a few dashes of pepper onto the plate. Play some music and turn the volume knob.
![]() Turn and Talk
Turn and Talk
Think about it. What's happening here? Answer these questions in your lab book.
What happened to the balloon as you adjusted the volume?
What happened to the pepper specks as you adjusted the volume?
Did the frequency of the vibrations change as the music changed? In what way?
Sound Station: Straw Pipes of Pan Flute
Every sound is made when something vibrates. Sometimes it's the skin stretched across a drum, sometimes it's a plucked string. By fine tuning the amount of what is vibrated, you can make notes. At this station you'll make a full octave of eight notes.
Materials:
- 7 straws (with 6 mm diameter)
- masking tape
- centimeter ruler
Procedure:
- Cut 1 straw into two pieces of lengths 10 cm and 9.5 cm.
- Trim the remaining 6 straws to make 6 pipes: 19.0, 16.9, 15.0, 14.1, 12.7, and 11.3 cm long. Make a pile of the shorter bits you've trimmed off these longer pipes. Cut the longest trimmed bit in half, and then set the whole pile aside.
- Twinkle, Twinkle, Little Star11 55 66 544 33 22 155 44 33 255 44 33 111 55 66 544 33 22 1Arrange the 8 pipes from longest to shortest so that one end is aligned. Add the shorter trimmed bits as spacers between the longer pipes.
- Lay a piece of masking tape across the pipes to hold it together.
- Label the pipes 1 through 8.
- Holding the pipes straight up and down (vertically) with the straight part just below your mouth, blow across their top openings of the straws.
- Play "Twinkle, Twinkle Little Star" using the notes in the box to the right:
- Find other songs to play on your Straw Pipes of Pan Flute.
![]() Turn and Talk
Turn and Talk
Think about it. How does this instrument work? Answer these questions in your lab book.
What happens when you blow across the top of the pipe?
What is vibrating to make the sound waves?
Does a long pipe make a high note or a low one? How about a short pipe?
Sound Station: Hydro-Xylophone
Every sound is made when something vibrates. Sometimes it's the skin stretched across a drum, sometimes it's a plucked string. BY fine tuning the amount of what is vibrated, you can make notes. At this station you'll make a full octave of eight notes.
Materials:
- 8 identical tall, thin glasses or jars, preferably with vertical sides.
- pitcher or bucket with at least 6 cups of water
- pencil or wooden dowel to use as a striker
- ruler
- towel for mopping up small spills (optional, but recommended!)
Procedure:
- Fill a glass halfway full. Tap its side to hear the note it makes.
- Add some water to the same glass. Tap its side to hear the note it makes. Is it higher or lower than the first note?
- Now your challenge is to fill each glass so that it makes a unique note. If you (or your partner) are a musician with a good ear, try to fill the glasses so that you have a full octave, or the eight notes "do", "re", "mi", "fa", "so", "la", "ti", and "do."
- Use the ruler to measure from the top of the glass to the top of the water. Record this "air column" value for each note.
- Try playing a tune! Beethoven's "Ode to Joy" should be possible. Or try to tap out the notes to "Old MacDonald," "The Itsy Bitsy Spider," or "Twinkle, Twinkle Little Star."
- When it's time to go to the next station, dump the water from all 8 glasses back into the pitcher.
![]() Turn and Talk
Turn and Talk
Answer these questions in your lab book.
What is vibrating to make a sound? How is it different in each glass?
What medium is transmitting the sounds waves?
If you figured out a song to play, write its notes down.
Sound Station: Tuning Forks
Do your best to avoid dropping your tuning forks. They are very easy to break. They are very delicate. Hold them only by the handle, and strike them only against rubber: if you don't have a sounding block, some science teachers and their students have used the sole of their shoe as a striking surface.
Materials:
- 2 tuning forks
- rubber sounding block (important: forks break easily when struck against hard surfaces)
- table tennis ball (usually known as a "ping pong ball")
- string
- stand
Preparation:
Procedure:
- Strike a tuning fork on the rubber block. Hold the vibrating end to your ear.
- Listen for the differences you hear between the different tuning forks and the numbers on them.
- Strike a tuning fork on the rubber block. Touch the handle of a vibrating tuning fork to the top of an empty desk or table.
- Strike a tuning fork on the rubber block. Quickly and gently touch the end of the tuning fork to the ping pong ball.
- Repeat steps 1 and 2 with all of the tuning forks.
![]() Turn and Talk
Turn and Talk
Think about it. How does that work? Answer these questions in your lab book.
What do the numbers on the tuning forks represent? Do the numbers correspond to the size of each fork? Why or why not?
Which tuning fork had the highest pitch? Why do you think that is?
What happened when you touched the tuning fork to the desk?
What happened to the ball after it was touched by the tuning fork? Why do you think that is?
Which tuning fork had the greatest effect on the ball? Why do you think that is?
Sound Station: Resonance Boxes
Resonance boxes and tuning forks make it possible to hear a usually undetectable phenomenon: waves transferring energy from one medium to another. They can be quite expensive, however, and you may be able to demonstrate a similar phenomenon by simply bringing the vibrating end of a tuning fork close to the surface of some water, and touching it to the surface.
Materials:
- 2 resonance boxes
- 2 tuning forks
- rubber or soft wooden striker for tuning forks (important: forks break easily when struck against hard surfaces)
- weight
- ruler (optional—for measuring an approximate distance)
Procedure:
- Space the resonance boxes about 20 cm apart. Be sure the open parts of the boxes are facing each other.
- Strike one of the tuning forks with a striker. Immediately grab the tuning fork that you hit.
- Listen to the other tuning fork.
- Repeat Steps 1–3 with a weight on the second tuning fork.
![]() Turn and Talk
Turn and Talk
Think about it. What's happening? Answer these questions in your lab book, or use this form.
What happened to the second tuning fork after you struck the first one with the striker? Why?
What happened when you tried this with a weight on one tuning fork? Why?
© SERP 2017
This Science Generation unit is currently in development. If you have comments or corrections, SERP would love to hear from you! Thank you.